Showing posts with label HF. Show all posts

Nov 25, 2023

ad-ven-ture


The year 2023 has been full of changes, both big and small, and I can say without any reservation, life truly is an adventure. In early May, shortly after returning to Wisconsin from Arizona, I purchased an Airstream Flying Cloud 23FBT travel trailer to replace the tiny Flyer Chase. Obviously the Airstream will handle expeditions of longer duration more comfortably, like those I have been making to Arizona. The Flyer Chase will stick around at least until next summer as I contemplate it's future.

At the end of August, I sold the Wisconsin condominium and began living full-time in the Airstream. This is again another significant life change. Thinking back, only two years ago I sold our retirement home on Lake Michigan soon after Nancy passed away and bought the condo. And now the Airstream is my home. Wow, what a change!

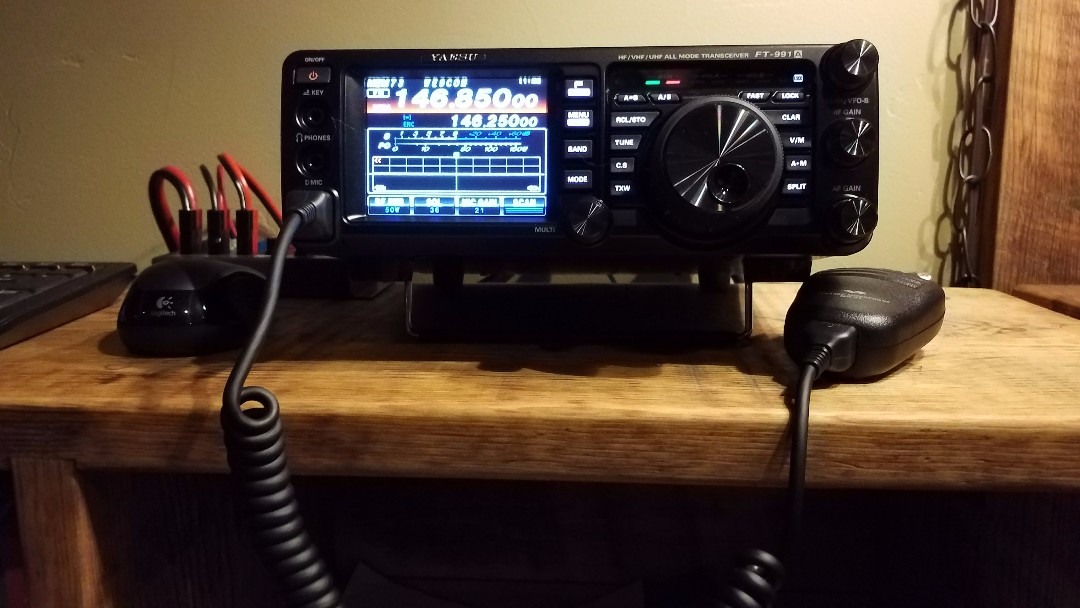
As for amateur radio, the residence changes have greatly affected the ability and capacity to get on the air. For now, the home-made Yaesu/Raspberry Pi YSF repeater is off-line and will likely not be up for an extended period of time. The Alinco/Raspberry Pi APRS digipeater station is also down, and along with the Yaesu FT-991A, they too are in storage. The Barker & Williamson 90' folded dipole is rolled up and in storage, and the GAP Titan DX has found a new home.

Looking at these changes as an opportunity to try new things, I began considering what I could do to make the Airstream feel more like home as well as provide space for some of my interests. One of the first things I did was carefully remove the twin bed on the curb-side of the trailer and save all the parts in storage. In the resulting floor space, I added a nice pattern rug and a Stressless swivel reclining chair, minus the included footstool. This provides a clean and very comfortable area that reminds me of a small [very small] den-like space. 


On the floor at the rear of this space, the tankless water heater will eventually be covered by a custom bookcase and space for a printer. At the front, a desktop will extend from the curb-side, over to and including the existing nightstand. Under the desktop will be hanging file folders and some other storage. The non-lifting portion of the top will allow space for the Yaesu FT-710 AEES and FTM-7250D transceivers, as well as a mini desktop computer and full-size monitor. Until then, the radios are located on Nancy's small table at the rear of this space.


After temporarily removing some cabinet bottoms and backs, I found a great way to run coax to the outside without risking water intrusion or changing the trailer's clean exterior appearance. Above the refrigerator, there is a large 5x20 inch screened and covered vent in the roof, and a perfect place to pass coax through. From this vent, I was able to run coax down behind the refrigerator and forward to the fresh water tank plumbing passage. From there, the coax runs under the floor, on top of the water tank to the plumbing passage at the water heater. The result is a clean, totally hidden coax run from the radios to the roof. Perfect.

For the HF radio, the Yaesu ATAS-120A antenna that was on the Flyer Chase setup is used. Mounting was done by using a right-angle stainless steel mirror-mount bracket attached to the curb-side of the AC chassis. The lower half of the chassis is a steel pan with vertical sides perfect for this. The antenna is in the clear as  much it can be without any alterations to the trailer body or roof. After running some tests, the antenna shows a SWR of 1:1 on 10 meters,  2.2:1 on 20 meters, and 4.7:1 on 40 meters. With these results, staying on 20 or above is best. Good thing 10 meters is wide open for the next few years!

The VHF/UHF antenna is currently in "receive only" mode until I decide how to handle that.

For power, there's no worries while the trailer is plugged in. When running off-grid, power is supplied by 200Ah of batteries, 300 watts of roof-mounted solar, and a 35A charge controller. At some point, I may be doubling the batteries and solar collection, but for now, there is no pressing need.

May God bless you as you draw close to Him!

Mar 22, 2022

Desert Experience

Desert Trails RV Park site 15, Tuscon Estates, Arizona
I haven't been able to do anything with ham radio since Nancy's illness. It's been about nine months since she passed away, so I am slowly moving forward with my life without her. I took off from the Wisconsin winter snow shoveling by staying at an RV park in the Tucson area for two months. I have a few more days here before I start heading home.

Before I left home, I thought I would bring the FT-991A and accessories along, and I'm sure glad I did. I mounted the radio by it's mobile mounting bracket to the cabinet shelf I made. I placed a fused line directly from the battery to the RigRunner so I can have extra connections for the Garmin GPS and a few other things, and my Heil mic is on a short boom. So far it has worked out great! An upcoming test will be when I get back on the road with the trailer. I'm planning on leaving everything in place except for the antennas.

The Yaesu FT-991A and FT3D in the camper
For ease of operating, I purchased a Yaesu ATAS-120A screwdriver antenna for HF, and a separate 2m/440 antenna, both mounted to the rails on top of the all aluminum camper. I made some heavy braided ground bonds from the mounts to the aluminum skin roof. So far, so good, but I will likely make two custom mounts from aluminum and bolt them directly to the roof. The SWR suffers a little with the current setup, so I believe a closer bond to the counterpoise will likely fix that.

With this setup I quickly made eight contacts, four of which are trans-equatorial on 10 meters. Pretty fun thing to do sitting in a tiny camper! I can hardly wait to do this in the middle of, well, anywhere!

Next on the list is getting my Raspberry Pi computer in the camper so I can use my logbook and other ham software while away from home.

East of Gates Pass, Tucson

Sep 8, 2020

Wire Antenna Suspension System

Back in October, 2019 I started planning a way to get the Barker & Williamson BWD-90 folded dipole up and running. Well, now it's up and here's how I did it.


Materials

350 feet of good 3/16" cord

Three (3) stainless steel pulleys (only 2 if your tower standoff arm already has pulleys)

Three (3) weights of the same weight (I cut solid metal bars to 5 pounds each)


Tools

A good throw line with launcher

A cutter for the cord

A lighter to melt the cord ends


How To

With a throw line, pull the two pulley cords (the red lines in the drawing) up and over the two support branches. Temporarily, leave the end with the pulley within reach from the ground.

Attach a cord to each end of the dipole antenna. 

Pass the antenna cords through the pulleys, leaving a generous length of cord on each end to accommodate for it's final horizontal length and vertical height. 

Temporarily attach a weight to each of these antenna cord ends.

If you are using a center support cord, attach a cord to an insulated center part of the antenna. Take the other end and run it through the center pulley. Tie a knot so it can't fall out of the pulley.

Pull the pulley cords, lifting the pulleys to full height. Leave about 18 inches of cord between the pulley and the support branch. While lifting the pulleys, the antenna cords should be moving through the pulleys and start raising the antenna.

When the pulleys are up in final position, cut the pulley cords just above ground height. Tie a loop and attach the loop to the base of the tree with a screw eye.

Pull the center antenna cord up to bring the antenna center into final position. Just above ground level, cut the cord and attach a weight. Temporarily secure this line to the tower to maintain the center positioning.

Pull the end cords to bring the antenna ends into final position. Just above ground level, cut the cords and attach the weights. The weights must be free to move, unrestricted, up to the pulleys.

Remove the device temporarily securing the center cord and weight. All three weights should now be just above ground level and free to move up as needed.

From time to time you may need to lower the antenna, so keep a length of cord to attach on the pulley lines for lowering. 

With this system, there is no extra cord laying on the ground to get caught in the lawn mower!

Enjoy your free-floating, suspended wire antenna without worry every time a storm blows!


Oct 6, 2019

The BWD-90 Folded Dipole

With all of the projects and ideas racing through my head lately, I realized I have neglected to set up the Barker and Williamson BWD-90 folded dipole antenna I got from my dad, K2JGL (SK). I have been very preoccupied with C4FM, MMDVM devices, repeaters, Raspberry Pi computers, WIRES-X, lightning arrestors, grounding, and maybe a few other things. It's time to get back on the air on HF and make some real DX QSO's with the awesome BWD-90 antenna.


Walking through our property looking for a suitable location to set up the antenna, I see this is going to be a bit more difficult than previously thought. The basic site characteristics to setup the antenna would be a flat open space at least 120' long, 50' wide, and 50 ' high. Well, we live in the woods, so that's not going to happen. Guess I'll have to settle for whatever site I can find.

One of the many great benefits of this antenna is the ability to change takeoff angles. My plan is to have the ability to adjust the antenna for several configurations. The following is taken from the Barker & Williamson user instructions.

NVIS propagation is performed as a flat-top with height varying from ground level to approximately 12 feet. This height is dependent on the ground (soil) conditions. It may be possible to lay the antenna on the ground in desert/low water table environments. The B&W NVIS pole kits allow multiple heights. In NVIS installations a counterpoise will sometimes enhance performance. If you are not getting enough distance from your NVIS setup, try raising the center of the antenna a few feet to make a very shallow inverted Vee. (Appropriate NVIS daytime frequencies are approx 5-12 Mhz, nighttime are 2-4 Mhz.) 


Conventional propagation minimum clear height is recommended at 25 feet for operation down to approx 3.5 Mhz (ends 12 feet for inverted Vee or sloper), and 40 feet for 1.8 Mhz (ends 20 feet for inverted Vee or sloper). Less height does not disqualify operation, but may require a tuner on the lowest frequencies. Also, propagation may be reduced with inadequate height on the lower frequencies. 


The next step is to design a support system that includes a left, center, and right side pulley system so the antenna can be set in any position with the ends from 12' to 24' high, and the center from 12' to 40' high. This would allow everything from a flat-top at 12', to an inverted V at 40' above ground.

See the Wire Antenna Suspension System to see how I finished this project.

Dec 12, 2017

Into the Future

As we get settled in to our new QTH, I find myself contemplating where and how I should set up my BWD-90 folded dipole antenna. Factors like the thick woods and metal 12/12 roof on our home, and the 55' tower behind it, makes finding a clear 110 feet not so easy. But wait, there may be an easy answer to this problem, like maybe the GAP Titan DX vertical antenna. As it goes, this was enough to open the box and look at other possibilities. Maybe its also time to look at digital amateur radio.

Long story short, a new GAP Titan DX is in the garage just waiting to talk to the world, and for the last couple days, I have been collecting data and programming the new Yaesu FT-991A and FTM-400XDR with all of the Wisconsin repeaters, now including digital and System Fusion repeaters. On the to-do list, need to get the Titan DX up and install the FTM-400XDR in the Jeep.


So far, I can say I am impressed with the YSF digital signal. I was listening to the Milwaukee W9RH YSF repeater last night and it was exceptionally clear and strong, and that repeater is just 20 watts. I can hardly wait to get on the air and try it out for myself. It would be nice to see more YSF repeaters out there with their dual analog/digital capability modes.

Dec 6, 2017

Dusting off the HF

Yesterday I went down in the basement and retrieved the box containing my HF rig and paraphernalia. I brought the box up to my desk and took a look inside. After a few minutes, I closed the box and pushed it under my desk.

This morning, I decided to stop putting it off and get my HF stuff set up again. About two hours later, I had it all done. And there I sat, with no HF antenna up yet, I realized I may have wasted my morning. Before giving up, I decided to connect the 2M/440 antenna and make sure that worked. It didn't take long until I realized something wasn't working right.


I refreshed my memory by cruising through parts of the user's manual. Yup... Okay... Check. Still not sure, I downloaded the programming data from the radio so I could take a look at it. Yup... Okay... Nope. Doesn't look right. I imported updated repeater data to the RT Systems software, and then uploaded it to the radio. So, to make a long story shorter, the HF stuff is back in the box.

Not like it was a totally wasted day though. I took this opportunity to dust off my FT-7900, re-program it with my new data set, and got it up and running. Awesome!