Showing posts with label RIGrunner. Show all posts

Jul 7, 2024

Airstream Ham Radio

In May of 2023, I began living full-time in my 2023 Airstream Flying Cloud 23FBT. As my interest in amateur radio continues, finding good information on setting up an amateur radio station in an RV, with all the issues surrounding mobility and power, doesn't come easy. I hope this explanation of my station setup will be helpful to those who operate out of an RV, and to my fellow Airstream owners who don't want to poke new holes in their trailer.

The two radios sit atop the table I made for Nancy before she passed away. Linux Mint runs CQRlog software.

Your station itself will probably be as individual as we are from each other, but the behind-the-radio setup has some specific rules to follow in order for the station to work properly. I won't get into all of that, as, since you are reading this, you are likely an operator and have at least a basic understanding of things. The real issue for many RV'ers is finding unobtrusive routes for cables, providing sufficient ground plane for antennas mounted to the RV, and protecting everything from the extended "earthquake" from moving your RV down the road, or off-road.

One of my main goals in building a setup is to not do something that cannot be undone and appear as if it never was. In other words, no new holes or modifications that can be detected by the casual observer's view; everything must be out of view and reversible. With this in mind, I found a way to route coax without creating any possible leaks. 

The 2023 Airstream FC23FBT, like many other RV's, has a roof-mounted snorkel-like refrigerator vent that has a very nice cover over it. This makes a perfect place to run coax up to the roof that no one will ever notice. For those with non-metal RV roofs, a roof-mounted antenna may not work, but this location may provide a top-side entry location for whatever setup you have. Be sure a sufficient grommet and cable holds are made to prevent damage to the coax while your RV is moving.

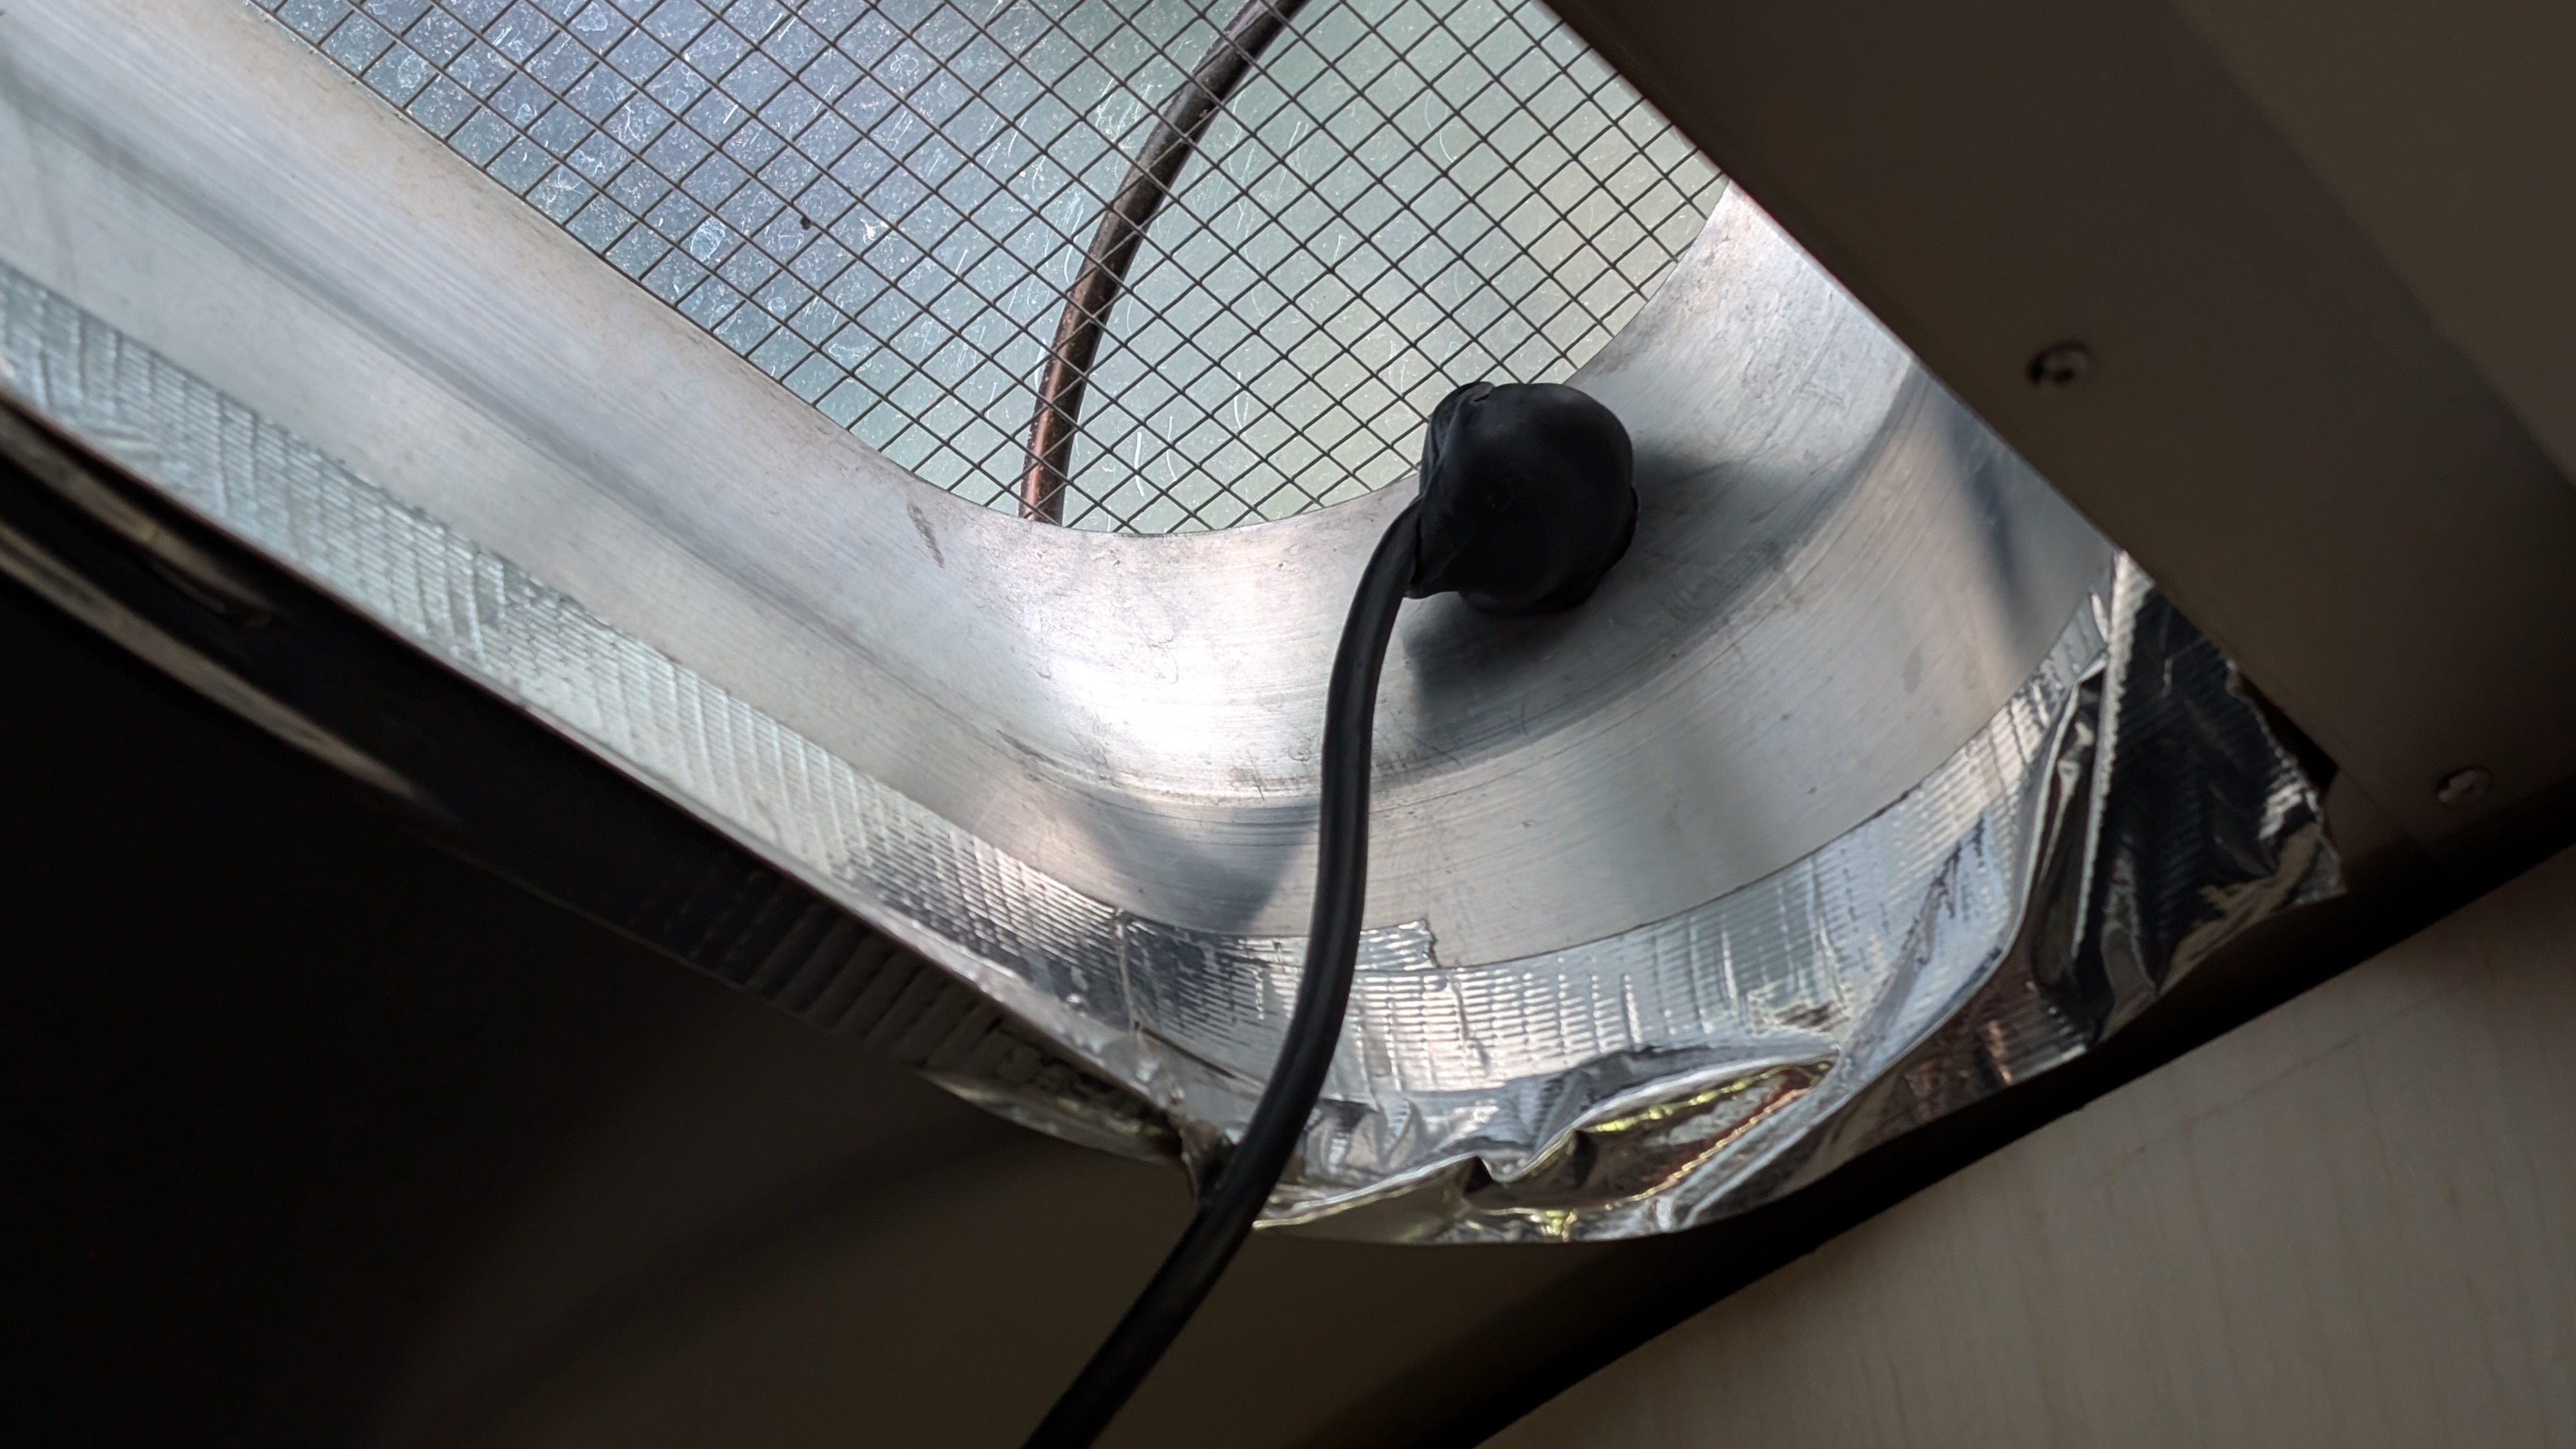
The coax passes through the front end of the refrigerator vent snorkel, behind the large cover.

In my case, I ran the coax from the vent, down behind the refrigerator and forward to a floor port where the plumbing comes up from the fresh water tank. From there, I fished the line on top of the water tank to another floor port on the curb-side of the trailer where the water heater is located. The coax comes up into the trailer there and to the radios sitting on a little table I made for Nancy. 

A Yaesu ATAS-120A screwdriver antenna is mounted with a UHF connector antenna bracket to the lower half side of the metal AC chassis. This is electrically grounded to the trailer body/skin which also acts as a ground plane for the antenna. I can also swap out the HF antenna for a 2m/440 antenna and flip the antenna switch to the Yeasu FTM-7250D. 

The antenna bracket is standing off the side of the AC chassis with extended bolts to allow for the AC's composite top cover to clear the antenna. Of course, antennas are removed and the radios are safely stowed while travelling.

The UHF connector antenna bracket with stand-off bolts is on the curb-side of the metal AC chassis.

Power is supplied directly off the batteries via a RIGrunner 4004U fuse block.

Internet connectivity is supplied via Starlink, which is now powered by a 12v to 48v step-up booster and PoE setup I made. A Nest router is also running on 12v so no shore power or inverter is needed for internet to operate. When Starlink isn't available due to overhead obstructions, such as tree cover, a PEPwave 4G/WiFi repeater router (also 12v) provides internet when 4G cellular or public WiFi is available.

Outcome

So far, I've accomplished my goal of operating from the Airstream without making irreversible changes.

There are no wires or cables detectable except where they are connected to devices. Perfect!

To date, I have had nothing but good signal reports. Awesome!

I have not run the AC while transmitting, but testing will show if there are issues with interference.

There seems to be no issues regarding receiving signals with the AC on.

After removing the curb-side bed and adding a Stressless recliner, there's plenty of room to relax and operate from anywhere.

Operating out of my winter get-away near Tucson, Arizona in grid DM42ke (Nov 2023)

Operating out of Hartman Creek State Park near Waupaca, Wisconsin in grid EN54jh (July 2024)

Taste and See...


1 John 3:1 Behold what manner of love the Father has bestowed on us, that we should be called children of God! Therefore the world does not know us, because it did not know Him. 2 Beloved, now we are children of God; and it has not yet been revealed what we shall be, but we know that when He is revealed, we shall be like Him, for we shall see Him as He is. 3 And everyone who has this hope in Him purifies himself, just as He is pure.

Aug 15, 2020

FT-7900R ZUM Repeater Build - Part 2


October of last year I set out to make a MMDVM repeater with my Yaesu FT-7800 and FT-7900 transceivers. At the time, the setup was in simplex mode as I researched duplexers for the two frequency, one antenna system. And there the project sat in the shack just taking up space and collecting dust. With my invested time accumulating and the research folder growing thicker, I found several characteristics about my repeater build that I decided to change.

Enclosures and Heat


In the former computer case with all the components situated side by side, the homebrew repeater occupied a large footprint in the shack. Taking a second look at this, with the transceivers being the same size and short in height, stacking them greatly reduces the required footprint.

Since my components already have protective cases on them, placing everything into yet another case is unnecessary and only inhibits heat dissipation. In the stacked configuration with the receive radio on top, mounting them on a single Yaesu SMB-201 cooling fan will allow better open-air circulation as well as direct fan cooling to the bottom of the transmitting radio's heat sink.


Power


For now, I am keeping the repeater in the shack, so a second power supply is not needed. My Yaesu FP-1030A has more than enough capacity to run the repeater while also running my FT-991A, FTM-7250, and a few other accessories. If and when the time comes to move it out, I have a 23 amp power supply with an attached RIGrunner 4004U ready to go. This will not only power the two radios, but the RPi controller as well with it's two USB 5 volt ports. Handy dandy cotton candy!
Raspberry Pi Cooling

The Raspberry Pi 3B+ and ZUM Radio GPIO hat setup I originally made was satisfactory, but a passive cooling setup would be better. To fix this, I put the RPi in an aluminum heat sink case, added a programmable Argon One Artik fan hat on an extended GPIO, and placed the ZUM Radio board on top of that. I placed the Pi setup on it's side (GPIO edge down) to allow better natural airflow up the warm faces.

My three other Raspberry Pi 4B's require cooling so each have an Argon One fan, but in this 3B+ application it really isn't necessary, though it's a nice feature to have if things do get too warm. I programmed the fan to turn on at 42 degrees C at 10% speed. With this, the fan rarely activates, and then only briefly. The higher quality fan, reduced run time, and modified speed should greatly extend the life if this setup. After watching this setup for some time, I found the Pi temperature stays around 39 C with only passive cooling.

Here, the MMDVM repeater RPi is on the left of my shack's four-Pi setup. All computers are on a LAN switch to help reduce RF exposure in the shack.


Wiring Harness


One thing I don't like is having a harness that's too long or too short for whatever the project is, especially in the shack where extra wires can turn into interference-producing antennas. For this reason, I modified the harness and made two ends using two standard RJ45 jacks. The DIN cables were shortened to 16 inches and combined into a single RJ45. The repeater board connection was also joined to a single RJ45 jack. The two components now connect together with a standard computer network cable of whatever length is needed for the components' location. Perfect!


Antennas


The biggest change of plans may forgo the use of a duplexer and single antenna setup. Instead, I may go with a less expensive collinear setup using two Diamond X50 antennas mounted on separate tower standoff arms. I've been running a similar setup at 5 watts for a short time and found it works quite well. So far, I have one LMR400-fed antenna up and working on the tower arm.


Considering my location in a tall forested lakefront area widely known as a difficult corridor for RF, and having a tower only 55 feet tall, there is no point in spending a lot of money on any setup here. Besides, this is for experimentation and just having fun with RF. That's a big part of what this is all about, right?

Nextion Screen


Having all this figured out left me with a little unused creativity, so I redesigned my Nextion screen appearance and layout. Thanks to WA6HXG for the original Nextion 3.2 HMI file, I just moved a few things around, changed the fonts and background images, and called it a day. The colors in this photo are off, but you get the idea. Still on the to-do list are: (1) purchase and install the X50 antennas, and (2) receive frequency allocation from Wisconsin Association of Repeaters.


Jul 7, 2020

Updated Shack - Episode II


I thought I was done making changes and additions to the shack, but I guess not. Just as summer arrives, so too, some new things have arrived at the shack.

The first addition to the shack is a Heil PR781 mic mounted on a PL2T boom, with a Pro 7 PTT hand button. The CC-1-YM wire harness connects everything to my Yaesu FT-991A. Using the equalizer settings suggested by Bob Heil, the audio reports are very favorable to this setup. Thanks Bob!


The second addition is KF7P combo antenna tower standoff arm which now suspends the center of my trusty old Barker & Williamson BWD-90 folded dipole antenna in a flat-top configuration at 40 feet. The antenna's heading is 140-320 degrees. So far, signal reports have been very good, but no DX attempts as of yet. Field Day, 13 Colonies and other special events, and POTA stations have been my focus for most of June. The 10 meter openings afforded fantastic QSO's all over the USA. A review of my log should help map out what the antenna is doing in it's current configuration and location.

The third addition is an MFJ-4712RC remote antenna switch between the BWD-90 folded dipole and the GAP Titan DX. It is interesting switching back and forth between each antenna and hearing their different characteristics. The folded dipole is far quieter and much better at pulling out even the quietest of signals. Love that Barker and Williamson BWD-90!

The Raspberry Pi computers also got an update. The 8G and 4G RPi's now sport an Argon Artik fan hat on top of a Geekworm heat sink armor case. Talk about nice! The fan hats are programmable for temperature and fan speed settings in custom configurations. I set mine to run 10% at 43 C, 25% at 47 C, 50% at 50, 75% at 53 C, and 100% at 56 C. With the huge Geekworm heat sink, the fan hat runs maybe every five minutes for a short time, even with the RTL-SDR dongle running the CPU with a constant 20-30% load. And with temps never getting above 43 C and the large fan running at only 10% every time it turns on, they are extremely quiet. No more worrying about heat on a Raspberry Pi 4!


The latest addition is the software package Barrier from the Raspberry Pi OS repositories. Super simple to set up and run, this package allows me to run my two (or more) desktop Raspberry Pi computers from one keyboard and mouse setup. Simply slide the mouse cursor to the edge of the screen, and it seamlessly goes to the other computer and screen. My small desk space just got a lot bigger with only one keyboard and mouse on it! Amazing! Open a terminal and run sudo apt install barrier on each computer. Select one as a server and the rest as terminals. Details here.


May 10, 2020

Updated Shack - Episode I


The planet earth has seasons, and that's a good thing because who can take twelve months of winter? I go through seasons too, probably just like you. Sometimes I get kind of bored with things and just need a change. Other times, after using something for a while, I get to a certain level of frustration that I ask myself, "Why do I put up with this?". Then the creative juices begin to flow and my tiny Shack gets an update!

I decided to take my credenza and add a small shelf to the front to hold a keyboard or two. Then I added a small back-angled shelf on top to hold the radios and allow small storage under the radios. Lastly, I added a back panel to mount two monitors, an antenna selector switch (behind the right monitor), and a RigRunner 4007U (below the monitors). The HP VH240a HDMI monitors with built-in speakers are mounted with Mount-It! MI-2829 tilt-swivel brackets. Two large pass-through holes at the base of the back panel put all wiring behind the credenza for a nice, clean install. A small shelf up top is home for the HTs, the ZUMspot and some other small things.

The shack is now run entirely on a Raspberry Pi 4B 4GB with the latest Raspberry Pi OS. The Debian Ham radio bundle which includes CQRLOG, JS8Call, WSJT-X, FreeDV, and a few other helpful programs, drive my USB connected Yaesu FT-991A. A Rowetel SM1000 sits to the right of the FT-991A. Also pictured is a Yaesu FTM-7250DR, and my old FT-7800R which will be trading places with my less-old FT-7900R, now used for local repeaters and simplex in my workshop.

Right now, I am quite content with this setup. But yes, I still have to get the old Barker & Williamson BWD-90 folded dipole up for HF. I like the GAP Titan DX, but verticals are so noisy compared to the folded dipole. And then I should probably do this, and maybe do that, or maybe just... be content!

So now I can enjoy Ham radio again at my tiny new shack. And then the next season will come. Change can be good, and God is always good!


Nov 10, 2018

Golf Sportwagen Mobile Setup

Moving my mobile rig into the Volkswagen presents a number of issues. Unlike the Jeep, which had a multitude of places to mount equipment, the Golf Sportwagen makes more efficient use of space for VW gadgets and options. Finding even a little space for the FTM-400 head, without blocking VW gadgets or sitting out of reach up on the hot dash, is quite a task. 

After a few trials, I settled on giving up the use of the storage box in front of the shift console, as I think it's the least intrusive, and safest place. The head is attached with a Ram flexible stem mount, which is attached to a 1/4" thick piece of oak cut to fit in the opening of the compartment I pulled from the dash.


The Sportwagen has a great place to mount up to a few radio bodies. On the driver's side of the rear cargo area, there is a trap door in the sidewall, located behind the rear wheel well. Remove this trap door and you have a solid, removable mounting platform for radio bodies and accessories. It makes for an out of the way mounting location that is easily accessed for servicing the gear in your mobile "utility room". The bodies remain in the climate controlled area of the car, and are hidden when the rolling cargo cover is pulled to the rear.


Power is supplied by a RIGrunner 4005H mounted above the radio body, which is wired directly to the batter with double fuse pairs on each end of the feed line. Power for the FT-991A or any other rig is ready and available for field day. 


The Comet NMO antennas are mounted on two stainless brackets I made and attached to the roof rails. Everything is electrically grounded, so after running the Comet CAA-500 Mark II on the setup, both antennas are about as good as it gets.